Create a WhatsApp Template
In the previous article, we explained how to start a conversation. We mentioned that when the 24-hour customer care window is closed, you need to start the conversation with a WhatsApp template.
✏️Additional info: WhatsApp 24h window explained
⏱️ What is the 24-hour customer care window?
If you're new to the WhatsApp API in Saysimple, the 24-hour customer care window (also called the "customer care window") is one of the most important things to understand.
The simple rule to remember:
Client messages you → 24-hour window opens → You can reply normally → 24 hours pass → Window closes → You need an approved template to start a new conversation.
In practice: when a client sends you a message, you have 24 hours to reply freely — no WhatsApp template required.
Example:
👤 Client: "Hi, I have a question about my order."
💬 You: "Of course! Let me check that for you."
You can continue chatting normally for the next 24 hours.
💬 Why does this window exist?
WhatsApp wants conversations to be started by the customer, or relevant to an ongoing conversation — not businesses sending unlimited unsolicited messages. Think of it as a conversation window: once a customer contacts your business, you have 24 hours to help them and keep the conversation going naturally.
Once 24 hours have passed since the client's last message, the window closes. If you want to reach out again after that, you'll need to start the conversation with an approved WhatsApp template.
🚫 What happens if you try to message outside the window?
If the 24-hour window has closed, Saysimple won't let you send a regular free-text message to that client. Instead, you'll need to select an approved template to restart the conversation. Keep an eye out for this in the conversation view — it's a good signal that it's time to switch to a template rather than a normal reply.
📋 What are WhatsApp templates?
Templates are pre-approved messages you can use to start a conversation once the 24-hour window is closed.
You create and manage templates in Saysimple Settings. Once submitted, they go through an approval process with Meta/WhatsApp before you can use them — so it's worth setting up the templates you'll need in advance, rather than waiting until you need one urgently.
Common uses for templates:
📦 Order updates
📅 Appointment reminders
📢 Marketing messages
🔔 Notifications
💰 What about cost?
The 24-hour window determines what kind of message you're allowed to send — it doesn't determine whether that message is free.
Meta charges for messages based on category and region, and those charges can apply whether you're inside or outside the window. So it's useful to keep these two things separate:
24-hour window → what type of message you're allowed to send
Meta pricing → what you may be charged for sending it
Prices vary by message category and recipient region, and Meta updates its pricing from time to time — always check Meta's current pricing for your specific market rather than relying on a fixed number.
🔄 When does the window open again?

The window is based on the client's latest message. For example:
Monday 10:00 → Client sends a message → 24-hour window opens
Monday 15:00 → Client sends another message → the window is extended (reset from this new message)
Tuesday 15:01 → Client hasn't sent anything else → the window is now closed
If the client messages you again after the window has closed, a new 24-hour window opens.
💡 Remember
Sending a template does not open the 24-hour window. Only a reply from the client opens it — so even after a template message, you're still waiting on the client to respond before you can chat freely again.
In this article, we’ll show you how to create a template in Saysimple.
Who can create templates?
Creating WhatsApp templates is only available to Admin and Manager users.
1. Go to WhatsApp Templates
Go to Settings → Workspace → WhatsApp Templates.
Here, you’ll see an overview of all your existing templates. You can see:
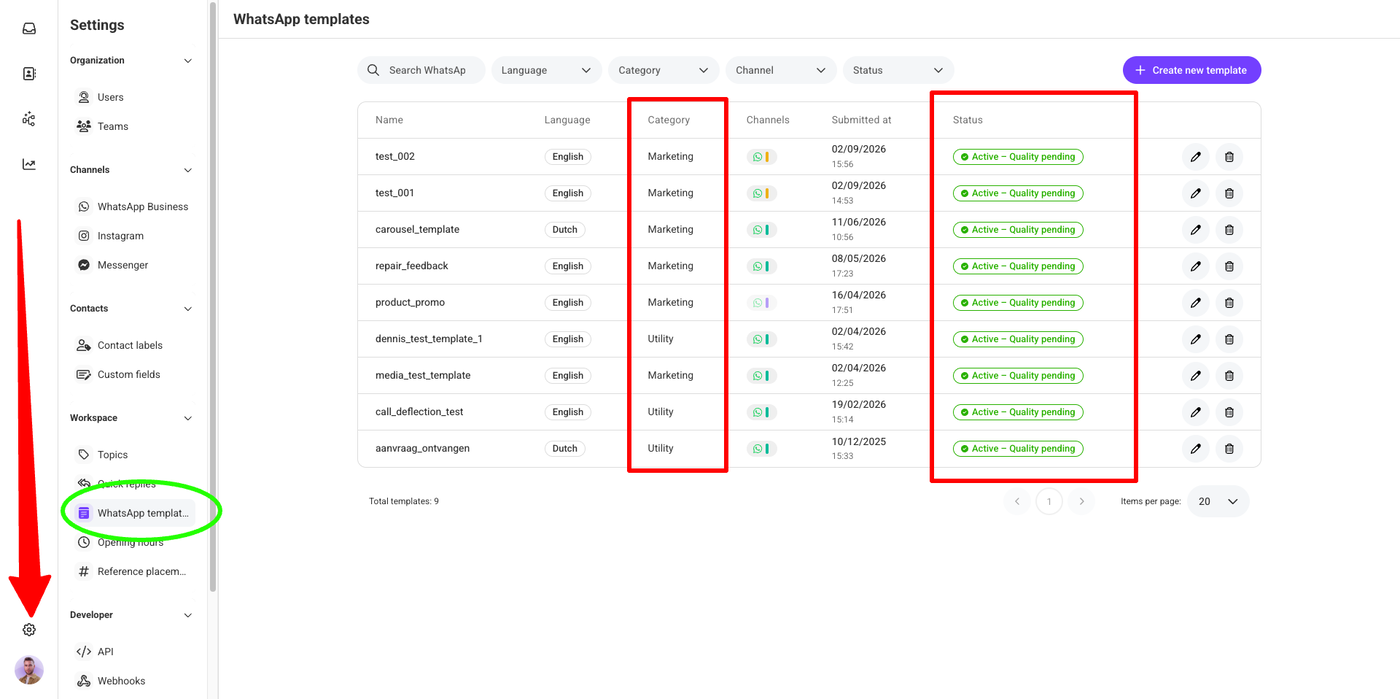
The template category: Marketing or Utility
The template status:
🟢 Green: Approved by Meta/WhatsApp
🔴 Red: Declined by Meta/WhatsApp
⚪ Grey: Still pending approval
Good to know: Template approval has nothing to do with Saysimple. When you submit a template, it is sent to Meta/WhatsApp for approval. Saysimple does not approve or reject your templates.
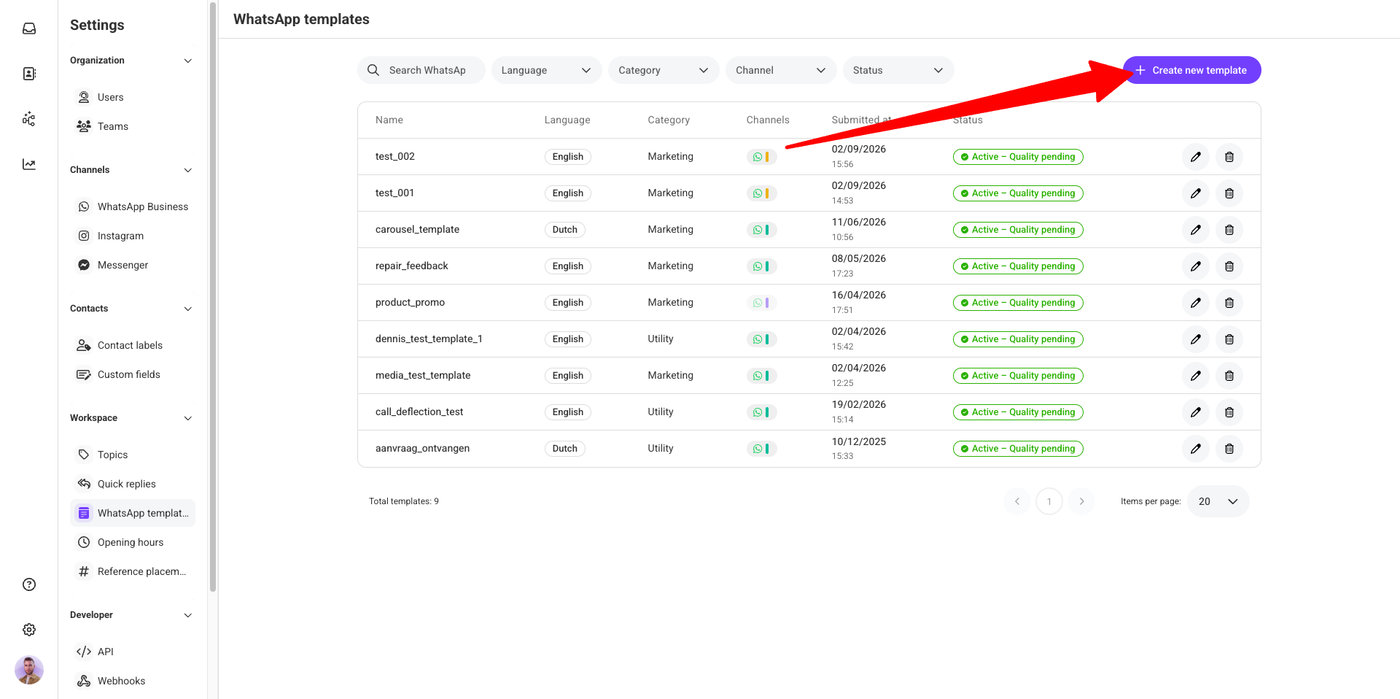
2. Create a new template
To create a new template, click the purple button at the top of the page.
3. Add Your Template Content
You can then start creating your WhatsApp template. Explained below, point by point:
1. Template settings
Here, you only need to fill in the information the system asks you for:
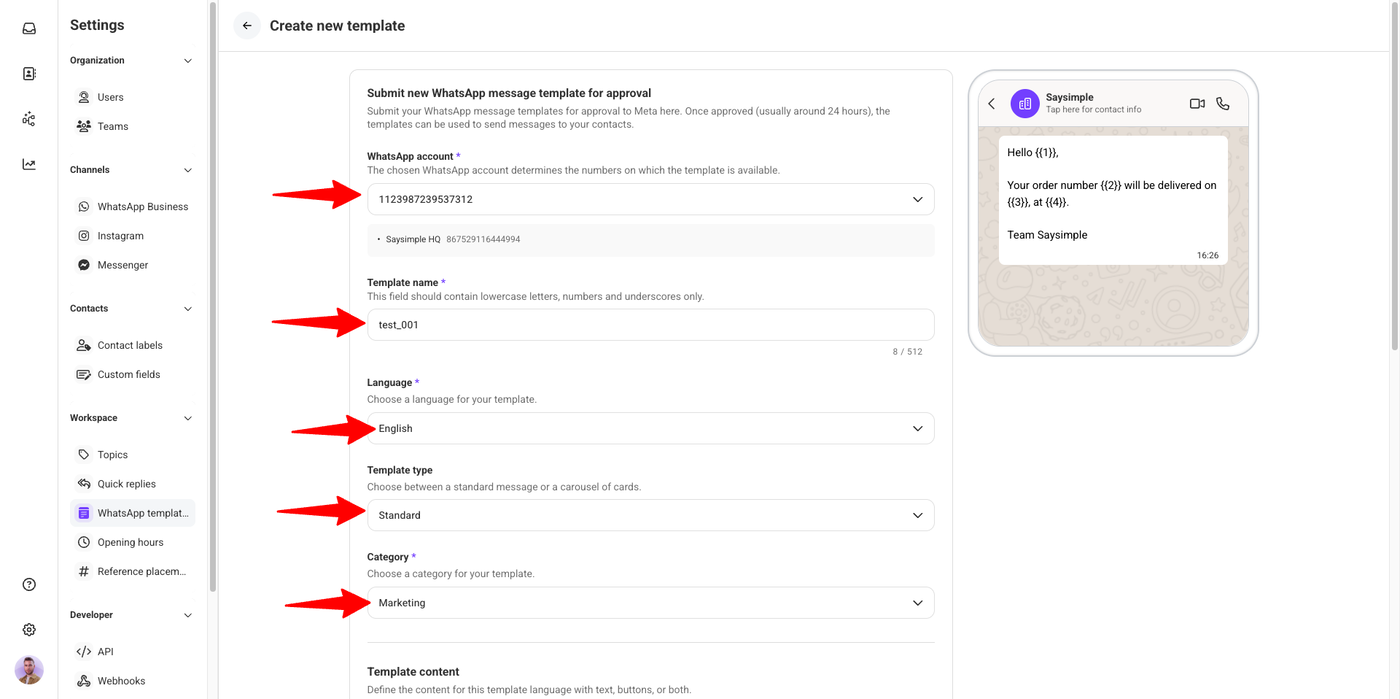
1. WhatsApp account
Select the WhatsApp account the template is linked to. You can have several phone numbers connected to Saysimple.
2. Language
Make sure the selected language matches the content of your template.
3. Type of template
Select the type of template: Normal or Carousel.
4. Category
Choose between Marketing and Utility.
The difference between the two is mainly the purpose of the message and the price. Here, you need to select the category you think your template belongs to. Later, the WhatsApp algorithm will review your template and may change the category if you selected the wrong one.
Marketing templates are used to inform or announce something.
Utility templates are used for updates and ongoing conversations related to a service or transaction.
If you're unsure which category your template should have, you can check the link here, which explains the different template categories in more detail.
💡 Good to know: Marketing templates are usually more expensive than Utility templates. The exact price may vary by a few cents depending on the region.
2. Template content
Create your template message
Here, you can type in your message. On the right-hand side, you’ll see a preview of the message and how it will look on WhatsApp.
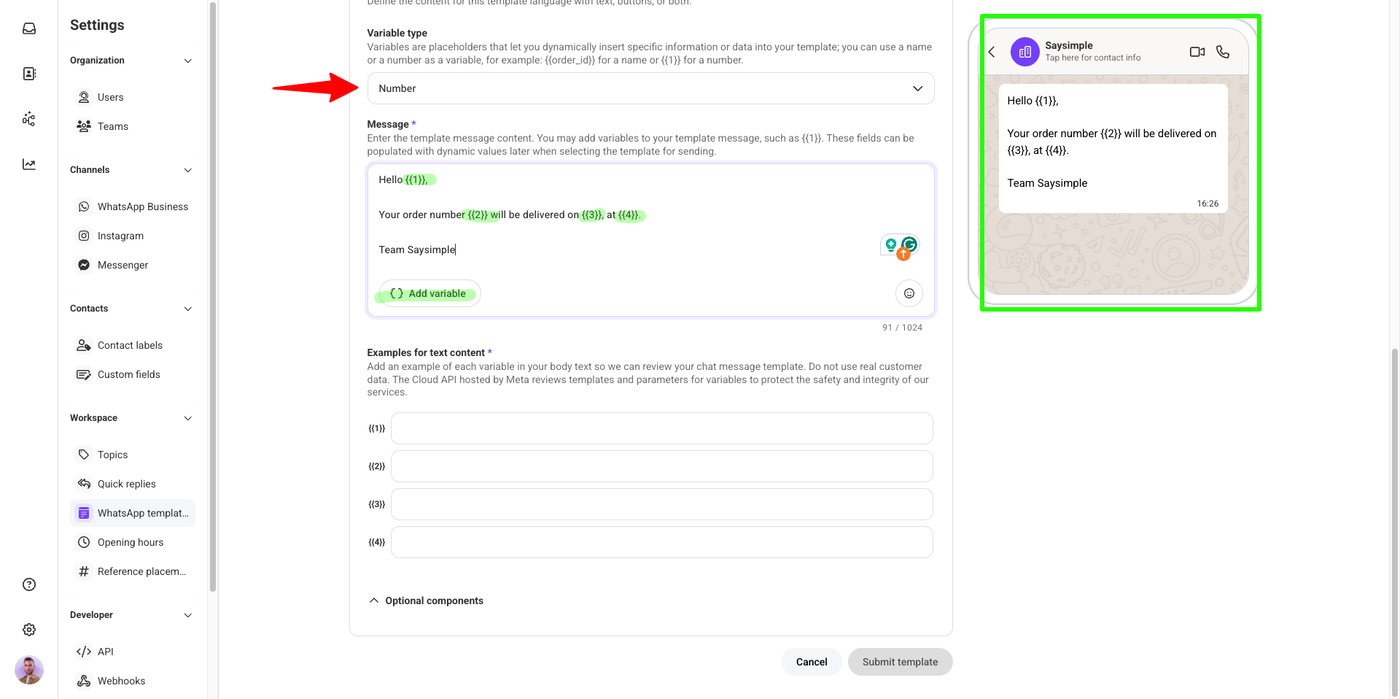
You can also add variables to your message. A variable is a “fill-in-the-gap” part of the text that can be filled with any information you need when sending the message.
Variables allow you to create general templates that can be useful for many different situations.
In this example, I’m creating a template to inform my clients about the delivery date and time of their order.
I selected numeric variables. These variables are filled in manually when sending the template, once I have a conversation with the client.
In this example:
Variable 1: The client's name
Variable 2: The order reference number
Variable 3: The delivery date
Variable 4: The delivery time
This means that the same template can be reused for different clients and orders, while the specific information is added each time you send it.
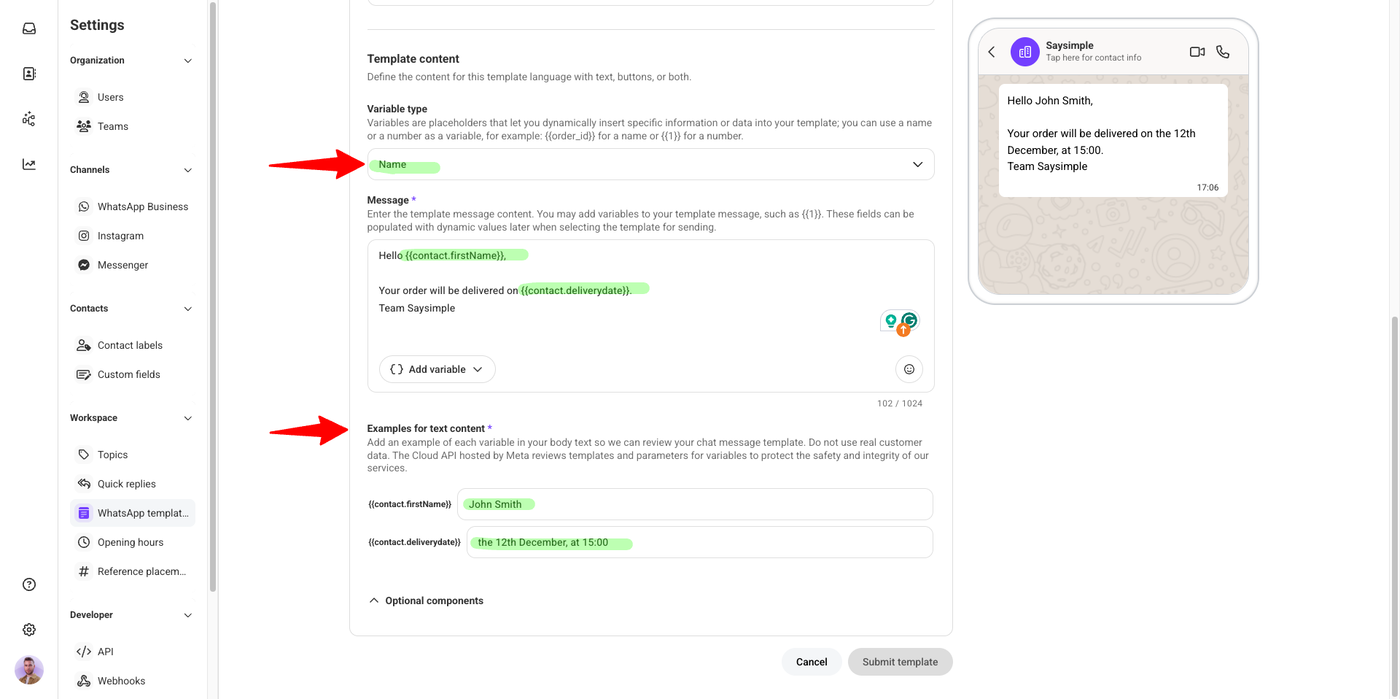
You can also select a variable type called “Name”.
The difference is that these are automatic variables. They retrieve information from the contact's information and automatically fill it in when sending the template.
In this example, I click on “Add variable”, and the system shows me the variables that are available.
Previously, in the Settings, you can add new contact fields. Once these fields are created, they become available as variables when creating templates, using the format {{contact.-----}}.
For example:
{{contact.firstname}}will retrieve the information from the contact and automatically fill in the client's name.{{contact.deliverydate}}will retrieve the delivery date if this information has previously been saved in the client's contact fields. The system will then automatically fill it in when sending the template.
This can save you time and reduce the need to fill in the same information manually every time.
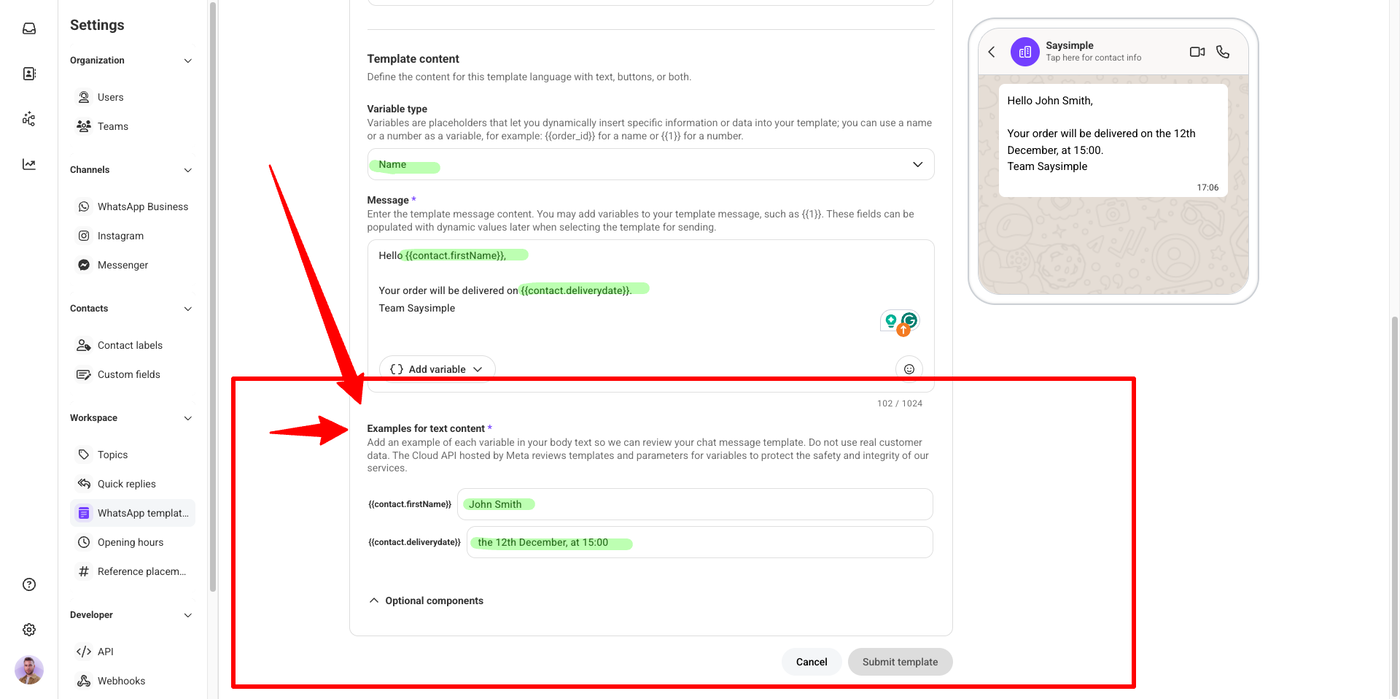
💡 Don't forget the sample values
Whether you use Name or Numeric variables, WhatsApp always needs example values to understand what type of information each variable will contain.
You can fill in an example for each variable when creating your template.
3. Template Attachments (header)
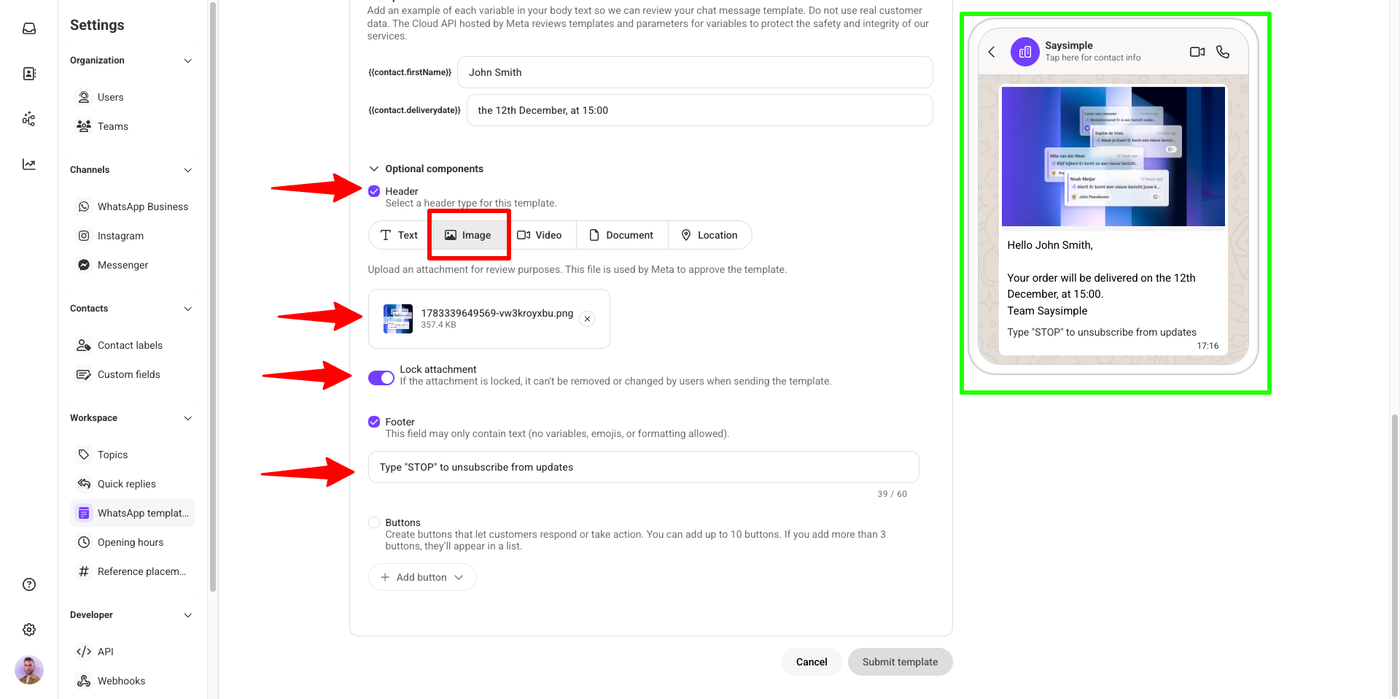
Add a header
You can also add a header to your template. This can be:
📝 Text — a short text header, for example, a title for your template.
🖼️ Image
🎥 Video
📄 Document
📍 Location
For media headers, make sure to upload your attachment and select whether it should be locked or unlocked.
If the header is locked, the template will always use the exact same attachment whenever you send it.
If the header is unlocked, you can attach a different photo, video, or document each time you use the template.
Add a footer
Finally, you can add a footer to your template.
A footer is a smaller piece of text that appears at the bottom of the message. It can be useful for adding a short note or extra information.
For example, you could use it to give clients the option to stop receiving updates.